Docker-Compose for Asp.Net Core & RabbitMQ
— Docker-Compose, Asp.Net Core, RabbitMQ, Docker — 4 min read

RabbitMQ is a popular open-source message broker. It is easy to implement in your application and manage your queue, exchange, and messages. It supports many programming languages. Also, you can use it with many technologies, such as web apps, RPC, Streaming, or IoT.
In this article, I will demonstrate how to configure a Docker-Compose environment for an ASP.NET Core Web API and RabbitMQ.
Example Application
In our application, we will have two projects. We will send a weather forecast notification to our queue via the Asp.Net Core Web API application and then receive the message in the Worker Service application.
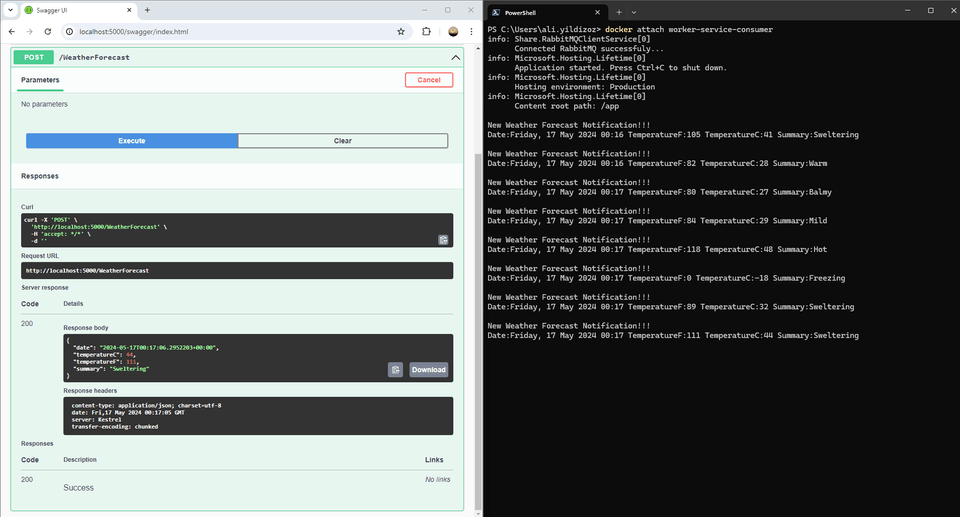
- Asp.Net Core Web API Application: This app will be our publisher. We will make an HTTP Post request with Swagger to publish our message.
- Worker Service Application: This app will be our consumer. We will receive messages here.
Connection String Configuration
When our apps run in a container they will be in the Production environment. So I added the RabbitMQ connection string to the appsettings.Production.json file.
"ConnectionStrings": { "RabbitMQ": "amqp://guest:guest@docker-rabbitmq-server:5672" }As you see I gave the server name as docker-rabbitmq-server. This name corresponds to the RabbitMQ service name in the docker-compose file. Docker provides a DNS service between containers in the same network. So we don't have to give the server IP address. It is important that we use the same connection string in both projects. They have to connect to the same RabbitMQ server.
I used the default username and password for RabbitMQ so I didn’t add an Environment Variable for those fields. You can provide those fields with environment variables at runtime for security vulnerabilities.
Sending Message
[HttpPost]public IActionResult Post(){ var weatherForecast = new WeatherForecast { Date = DateTime.Now, TemperatureC = Random.Shared.Next(-20, 55), Summary = Summaries[Random.Shared.Next(Summaries.Length)] };
_rabbitMQPublisher.Publish(weatherForecast);
return Ok(weatherForecast);}After running the web API, we will make a post request to this action. As you see, it creates a random temperature and summary and then publishes it.
Receiving Message
public override Task StartAsync(CancellationToken cancellationToken) { _channel = _rabbitMQClientService.Connect(); _channel.BasicQos(0, 1, false); return base.StartAsync(cancellationToken); } protected override async Task ExecuteAsync(CancellationToken stoppingToken) { var consumer = new AsyncEventingBasicConsumer(_channel); _channel.BasicConsume(RabbitMQClientService.QueueName, false, consumer); consumer.Received += Consumer_Received; }
private async Task Consumer_Received(object sender, BasicDeliverEventArgs @event) { var weatherForecast = JsonSerializer.Deserialize<WeatherForecast>(Encoding.UTF8.GetString(@event.Body.ToArray()));
Console.WriteLine("\nNew Weather Forecast Notification!!!"); Console.WriteLine($"{nameof(weatherForecast.Date)}:{weatherForecast.Date.ToString("f")} {nameof(weatherForecast.TemperatureF)}:{weatherForecast.TemperatureF} {nameof(weatherForecast.TemperatureC)}:{weatherForecast.TemperatureC} {nameof(weatherForecast.Summary)}:{weatherForecast.Summary}");
_channel.BasicAck(@event.DeliveryTag, false); }I chose the worker service as the consumer app because it has built-in DI(Dependency Injection), Configuration tool, appsettings file, etc. You can do anything you want here what you do in an Asp.Net Core App too. Our worker service will run automatically after the app is launched.
Here we connected to the Received event. If the queue receives a message, it will trigger this event.
You can see the app from here.
Docker-Compose
1version: '3.8'2
3services:4 asp-net-core-publisher:5 container_name: asp-net-core-publisher6 image: aliyildizoz909/docker-demo-rabbitmq-publisher-rabbitmq-publisher7 ports:8 - "5000:8080"9 depends_on:10 - docker-rabbitmq-server 11 worker-service-consumer:12 container_name: worker-service-consumer13 image: aliyildizoz909/docker-demo-rabbitmq-publisher-rabbitmq-consumer14 depends_on:15 - docker-rabbitmq-server16 docker-rabbitmq-server:17 container_name: docker-rabbitmq-server18 image: rabbitmq:3-management19 ports:20 - "15672:15672"21 - "5672:5672"We have three services here: the first one is our web API the publisher, the second one is our worker service the consumer and the third one is the RabbitMQ server.
asp-net-core-publisher
asp-net-core-publisher: container_name: asp-net-core-publisher image: aliyildizoz909/docker-demo-rabbitmq-publisher-rabbitmq-publisher ports: - "5000:8080" depends_on: - docker-rabbitmq-servercontainer_name: asp-net-core-publisher: We set the container name asasp-net-core-publisherimage: aliyildizoz909/docker-demo-rabbitmq-publisher: We specify the image source as aliyildizoz909/docker-demo-rabbitmq-publisher."5000:8080": Here, we did a port publish. When we go to the 5000 port via localhost, we tell the docker to redirect the requests to the 8080 port in theasp-net-core-publishercontainer. 8080 port is the default port of our published app in the container for asp.net core apps. You can change it via theASPNETCORE_URLSenvironment variable or with the new oneASPNETCORE_HTTP_PORTS. See more information.depends_onThis section defines the priority of services to run. We add here which services we want to run before the current service. So, in our example, we adddocker-rabbitmq-serverhere to run our application after the RabbitMQ server is ready.
worker-service-consumer
worker-service-consumer: container_name: worker-service-consumer image: aliyildizoz909/docker-demo-rabbitmq-consumer depends_on: - docker-rabbitmq-servercontainer_name: worker-service-consumer: We set the container name asworker-service-consumerimage: aliyildizoz909/docker-demo-rabbitmq-consumer: We specify the image source as aliyildizoz909/docker-demo-rabbitmq-consumer.depends_on: Before the application runs the RabbitMQ server should be ready otherwise, it will not be able to connect and will give an error.
docker-rabbitmq-server
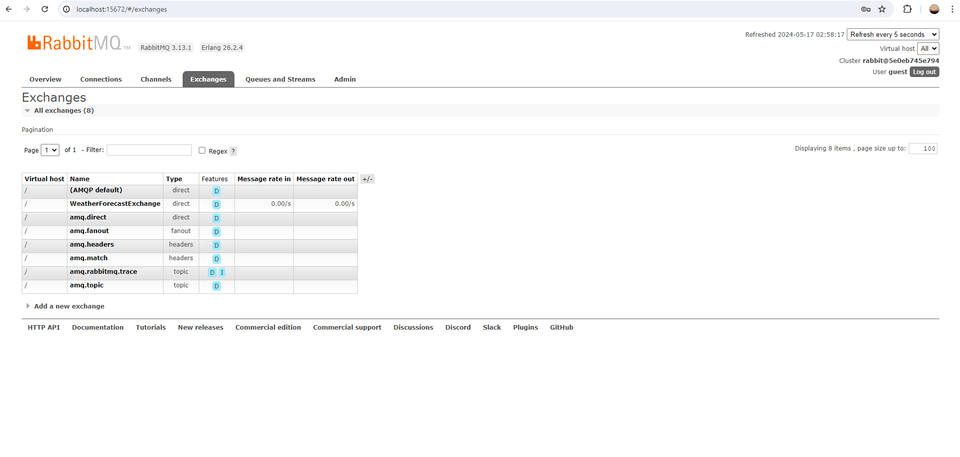
docker-rabbitmq-server: container_name: docker-rabbitmq-server image: rabbitmq:3-management ports: - "15672:15672" - "5672:5672"container_name: docker-rabbitmq-server: We set the container name asdocker-rabbitmq-serverimage: rabbitmq:3-management:We specify the image source as rabbitmq:3-management. I utilized the3-managementtag for this image to enable the RabbitMQ management plugin for monitoring exchanges, queues, and messages. This tag will provide a management tool atlocalhost:15672.15672:15672: These ports represent the management plugin.5672:5672: These ports represent the RabbitMQ server.
Running Docker-Compose File
To run our Docker-Compose setup, use the following command from the directory containing your docker-compose.yml file
docker compose upAfter running this command, we can access our application here http://localhost:5000
Docker Desktop

Swagger View

RabbitMQ Management Plugin
App Demo
Thank you.