Understanding Asp.Net Core Dockerfile
— Dockerfile, Asp.Net Core, Docker — 14 min read
Dockerfile Build Process
A Dockerfile is a file that contains a set of instructions listed sequentially. In other words, it is a set of instructions. Docker reads and builds these files to create images and later uses these images to create containers.
But how it works?
When we build a Dockerfile, Docker starts many processes from the first line down to the end of the lines. Every line corresponds to an image layer, using the previous layer as a base image. Docker also caches every layer in this process to avoid building the unchanged layers again. With this cache mechanism, Docker reduces the building time.
Docker build steps
- In the first step, Docker reads the first line and pulls(if it does not exist) the specified base image from a registry during the
FROMinstruction process. - If there are executions of instructions in the Dockerfile, such as
RUN,COPYorADDDocker creates a temporary container from the previous image layer and executes these instructions in this container. After completing the executions, Docker captures the changes in the temporary container and creates a new layer in the image from these changes.. After executions of instructions the layer will be created and Docker removes these temporary containers. - If a multi-stage build is involved and the stages don't depend on each other, Docker builds every stage in parallel.
- After Docker creates layers for each line, it tags these layers with a final image.
Importance of Instruction Order
Due to the caching mechanism, the order of instructions becomes very important. When creating a Dockerfile, we should first add the instructions that are less likely to change.
For example, we have a Dockerfile below.
FROM scratchCOPY src .EXPOSE 80We had built this file, and Docker started to put every line into the cache. Later, we needed to change our source files and rebuild the image. In this case, docker has been building COPY src . and EXPOSE 80 lines, but do not build FROM scratch line, it gets it from the cache. This happens because the changes happen after FROM instruction, they don't affect this layer.
If we change the Dockerfile below
FROM scratchEXPOSE 80COPY src .Even if we change src files, Docker would not rebuild the EXPOSE 80 line. It uses the cached layer because the changes happen after this line.
After understanding how Docker builds a Dockerfile, we can review every Asp.Net Core Web API Dockerfile instruction.
Asp.Net Core Web Api Dockerfile
VS 2022 has a Docker support tool that helps us create and build Dockerfiles or run containers. This is the default Dockerfile with recommended instructions provided by the VS 2022.
1FROM mcr.microsoft.com/dotnet/aspnet:8.0 AS base2USER app3WORKDIR /app4EXPOSE 80805EXPOSE 80816
7FROM mcr.microsoft.com/dotnet/sdk:8.0 AS build8ARG BUILD_CONFIGURATION=Release9WORKDIR /src10COPY ["DockerDemoWebApi/DockerDemoWebApi.csproj", "DockerDemoWebApi/"]11RUN dotnet restore "./DockerDemoWebApi/DockerDemoWebApi.csproj"12COPY . .13WORKDIR "/src/DockerDemoWebApi"14RUN dotnet build "./DockerDemoWebApi.csproj" -c $BUILD_CONFIGURATION -o /app/build15
16FROM build AS publish17ARG BUILD_CONFIGURATION=Release18RUN dotnet publish "./DockerDemoWebApi.csproj" -c $BUILD_CONFIGURATION -o /app/publish /p:UseAppHost=false19
20FROM base AS final21WORKDIR /app22COPY --from=publish /app/publish .23ENTRYPOINT ["dotnet", "DockerDemoWebApi.dll"]1. FROM mcr.microsoft.com/dotnet/aspnet:8.0 AS baseWe pulled an image with the FROM instruction and gave it a temporary name(base). This image is a Debian OS image that includes the Asp.net Core 8.0 runtime. You can see its Dockerfile here.
Why do we add an image as a base here?
To run an application, we should have an OS that has our application's dependencies. Without a base image, we can't run our applications.
2. USER appHere, we switch to the app user. After this instruction, our OS changes the default user(root) to the app user. The app user has fewer permissions than the root user, which is better than using a limitless permission user for potential security vulnerabilities. See more information
3. WORKDIR /appWith this instruction, we switched to the /app directory. If /app doesn't exist, Docker creates it. This directory contains our published application files.
base-stage└── app4. EXPOSE 80805. EXPOSE 8081Here, we specify to docker that our app uses the 8080 and 8081 ports. This is not a port publish; do not get it wrong. Our application uses these ports between other containers that connect to it, not outside the container. If you want to access the ports from outside the container, you should make a port publish.
7. FROM mcr.microsoft.com/dotnet/sdk:8.0 AS buildWe can use multi-stage builds in Dockerfiles. In this Dockerfile, we have 4 stages; every stage has a name and some operations to prepare the final stage. We use it to build multiple operations simultaneously, reducing the building time and the image size.
How do multi-stage builds reduce image size?
To develop a .Net application, we first need an SDK(Software Development Kit). Without an SDK, we can't publish or build our application. However, SDKs are large, and they increase image sizes too much if we consider that we only need a runtime to run our application(that's why we used a runtime as a base image, not an SDK). At this point, multi-stage builds are very helpful in avoiding unnecessary tools and SDKs. After a stage is completed, we move the files created by SDK to the final stage. Docker doesn't move the SDK or the tool we installed in this stage to the final stage. So, in this way, our image only has a runtime and uses the SDK, too.
In this line, we create a stage named build from .Net SDK Image. In this stage, we perform our application's build operations.
8. ARG BUILD_CONFIGURATION=ReleaseIn this line, we declare an ARG named BUILD_CONFIGURATION with default value(Release). We use this arg to change the build and publish configuration when we build Dockerfile.
Dockerfile lets us change the build behavior at runtime when we execute the build command. We have two versions of our base image, and we want to build and publish our app with these two versions.
What can we do here?
First, we use two different Dockerfiles and add both versions to them. Yes, it works for us, but we have to build these images separately. However, if we use an arg like this ARG VERSION then, if we add the arg with $ in our base image statement like this FROM base-image:$VERSION we can change the version when building the Dockerfile with --build-arg flag.
example: docker build --build-arg VERSION=1.0 -t my-app:1.0
9. WORKDIR /srcWe switch to the /src directory in the build stage. Every stage has its own file system based on the image of the stage. So this is the directory, and the /app directory in the 3. line are in the different file systems.
build-stage└── src10. COPY ["DockerDemoWebApi/DockerDemoWebApi.csproj", "DockerDemoWebApi/"]COPY is the most necessary instruction in a Dockerfile; if we cannot copy our application to the image, what is the meaning of dockerizing the app? In this line, we copy our app file with the .csproj extension to the DockerDemoWebApi directory in the /src file. When we use the COPY instruction, Docker creates a directory even if it doesn't exist in the image, like the WORKDIR instruction.
The important thing about the COPY instruction is to consider which path to use when executing the docker build command. If we provide the wrong build context to the command, Docker does not find the files we want to copy and give an error.
Why we only copied DockerDemoWebApi.csproj file?
Before building the application, we should install its dependencies, such as the packages, libraries, or frameworks it uses. If docker can't install a package, it stops the build process, allowing us to catch errors easily. Another reason we do this is to benefit from the cache mechanism. Once we install all packages successfully, Docker does not install the packages even if we rebuild the Dockerfile again. It uses this layer from the cache.
build-stage└── src └── DockerDemoWebApi └── DockerDemoWebApi.csproj11. RUN dotnet restore "./DockerDemoWebApi/DockerDemoWebApi.csproj"We use RUN instructions to execute specified commands. In this line, we execute the dotnet restore command. This command creates config files to install our packages for the provided project. (./DockerDemoWebApi/DockerDemoWebApi.csproj).
build-stage└── src └── DockerDemoWebApi ├── obj │ ├── DockerDemoWebApi.csproj.nuget.dgspec.json │ ├── DockerDemoWebApi.csproj.nuget.g.props │ ├── DockerDemoWebApi.csproj.nuget.g.targets │ ├── project.assets.json │ └── project.nuget.cache └── DockerDemoWebApi.csproj12. COPY . .We copy everything from the build context to the src directory in this line.
build-stage└── src └── DockerDemoWebApi ├── Controllers │ └── WeatherForecastController.cs ├── obj │ ├── DockerDemoWebApi.csproj.nuget.dgspec.json │ ├── DockerDemoWebApi.csproj.nuget.g.props │ ├── DockerDemoWebApi.csproj.nuget.g.targets │ ├── project.assets.json │ └── project.nuget.cache ├── Properties │ └── launchSettings.json ├── appsettings.Development.json ├── appsettings.json ├── DockerDemoWebApi.csproj ├── Program └── WeatherForecast.cs.dockerignore
Our project has many folders and files. Most of them were created during development. These files make the development process easier and speed up the building process. However, we don't need them in the image. Firstly, we start building the application in the image(dotnet build), and also, we don't develop it in the image. To avoid these files, we use the .dockerignore file. This also increases the building time when we build the Dockerfile.
**/.dockerignore**/.env**/.git**/.gitignore**/.vs**/.vscode**/bin**/docker-compose***/Dockerfile***/node_modules**/objLICENSEREADME.md!**/.gitignore!.git/HEAD!.git/config!.git/packed-refs!.git/refs/heads/**13. WORKDIR "/src/DockerDemoWebApi"We changed the working directory to build our application.
14. RUN dotnet build "./DockerDemoWebApi.csproj" -c $BUILD_CONFIGURATION -o /app/buildHere, we build our application with dotnet build command. To build our application with this command, we should give the application path where the files with the .csproj or .sln extension exist. With -c flag, we indicate which configuration(Debug or Release) we build the application with. We used $BUILD_CONFIGURATION arg here. This means we can provide this value when we build Dockerfile. If we don't provide it, the Docker uses the default arg value(8th Line). With -o flag, we provide the path that dotnet saves the created files after the building process.
build-stage├── src│ └── DockerDemoWebApi│ ├── Controllers│ │ └── WeatherForecastController.cs│ ├── obj│ │ ├── DockerDemoWebApi.csproj.nuget.dgspec.json│ │ ├── DockerDemoWebApi.csproj.nuget.g.props│ │ ├── DockerDemoWebApi.csproj.nuget.g.targets│ │ ├── project.assets.json│ │ └── project.nuget.cache│ ├── Properties│ │ └── launchSettings.json│ ├── appsettings.Development.json│ ├── appsettings.json│ ├── DockerDemoWebApi.csproj│ ├── Program│ └── WeatherForecast.cs└── app └── build ├── appsettings.Development.json ├── appsettings.json ├── DockerDemoWebApi.deps.json ├── DockerDemoWebApi.dll ├── DockerDemoWebApi.exe ├── DockerDemoWebApi.pdb ├── DockerDemoWebApi.runtimeconfig.json ├── Microsoft.OpenApi.dll ├── Swashbuckle.AspNetCore.Swagger.dll ├── Swashbuckle.AspNetCore.SwaggerGen.dll └── Swashbuckle.AspNetCore.SwaggerUI.dllIf you notice, the app folder is on the same level as the src folder, that is because we provide the build path with a starting slash(-o /app/build). This usage creates folders at the root level.
16. FROM build AS publishDocker also allows us to create a stage from another stage like here(16th line). In this stage, we do our publishing operations.
17. ARG BUILD_CONFIGURATION=ReleaseYou may ask why we defined the BUILD_CONFIGURATION arg again; can't we use the previous one? I quote from the docker doc. for the answer.
An
ARGvariable definition comes into effect from the line on which it is defined in the Dockerfile not from the argument's use on the command-line or elsewhere. Source: Dockerfile reference | Args-Scope
18. RUN dotnet publish "./DockerDemoWebApi.csproj" -c $BUILD_CONFIGURATION -o /app/publish /p:UseAppHost=falseWith dotnet publish command, we publish our app using the provided configuration. The only strange thing is /p:UseAppHost=false . This expression means set false value to the UseAppHost property (/p:). .Net applications have some settings for development and publishing operations. We can change these settings in the project file(.csproj), or we can change them while building or publishing the application with a command. Basically, the UseAppHost property controls whether or not a native executable(the .exe file) is created for deployment. In the container, we don't execute this file manually; even if we want to, we still cannot run it in a Linux OS. Therefore, this file is not necessary. Also, it increases the image size if we create it.
publish-stage├── src│ └── DockerDemoWebApi│ ├── Controllers│ │ └── WeatherForecastController.cs│ ├── obj│ │ ├── DockerDemoWebApi.csproj.nuget.dgspec.json│ │ ├── DockerDemoWebApi.csproj.nuget.g.props│ │ ├── DockerDemoWebApi.csproj.nuget.g.targets│ │ ├── project.assets.json│ │ └── project.nuget.cache│ ├── Properties│ │ └── launchSettings.json│ ├── appsettings.Development.json│ ├── appsettings.json│ ├── DockerDemoWebApi.csproj│ ├── Program│ └── WeatherForecast.cs└── app ├── build │ ├── appsettings.Development.json │ ├── appsettings.json │ ├── DockerDemoWebApi.deps.json │ ├── DockerDemoWebApi.dll │ ├── DockerDemoWebApi.exe │ ├── DockerDemoWebApi.pdb │ ├── DockerDemoWebApi.runtimeconfig.json │ ├── Microsoft.OpenApi.dll │ ├── Swashbuckle.AspNetCore.Swagger.dll │ ├── Swashbuckle.AspNetCore.SwaggerGen.dll │ └── Swashbuckle.AspNetCore.SwaggerUI.dll └── publish ├── appsettings.json ├── DockerDemoWebApi.deps.json ├── DockerDemoWebApi.dll ├── DockerDemoWebApi.pdb ├── DockerDemoWebApi.runtimeconfig.json ├── Microsoft.OpenApi.dll ├── Swashbuckle.AspNetCore.Swagger.dll ├── Swashbuckle.AspNetCore.SwaggerGen.dll ├── Swashbuckle.AspNetCore.SwaggerUI.dll ├── web.config └── appsettings.Development.json20. FROM base AS finalWe create a stage named the final from the base stage.
21. WORKDIR /appWe change the working directory to /app.
22. COPY -from=publish /app/publish .In the COPY instruction, we can also copy files from another stage or an image from a registry. To use COPY like that, we use --from flag. In this line, we copied all the files in the publish folder from the publish stage to the /app directory.
final-stage└── app ├── appsettings.json ├── DockerDemoWebApi.deps.json ├── DockerDemoWebApi.dll ├── DockerDemoWebApi.pdb ├── DockerDemoWebApi.runtimeconfig.json ├── Microsoft.OpenApi.dll ├── Swashbuckle.AspNetCore.Swagger.dll ├── Swashbuckle.AspNetCore.SwaggerGen.dll ├── Swashbuckle.AspNetCore.SwaggerUI.dll ├── web.config └── appsettings.Development.json23. ENTRYPOINT ["dotnet", "DockerDemoWebApi.dll"]After making our application ready to run, we use ENTRYPOINT instructions for the running operation. Here, we tell Docker to run our application automatically when someone creates a container from the image created from this Dockerfile.
Building Dockerfile
I use the docker build command for this operation, but you can also build it with the VS 2022 Docker Support tool.
Build Command Schema
docker build [OPTIONS] PATH | URL | -The first step in building a Dockerfile is specifying the build context. The built context means that when Docker starts to build the Dockerfile, it copies your files from which PATH or URL. In our Dockerfile, we copy every file from under the DockerDemoWebApi folder. Because of that, our built context has to be the parent folder of the DockerDemoWebApi folder. To understand more, in the 10th line, we specify docker that our DockerDemoWebApi.csproj file is under the DockerDemoWebApi folder. So if I give a wrong build context to docker, it searches the DockerDemoWebApi folder, and because of the wrong build context, error occurs.
docker build ./WrongBuildContext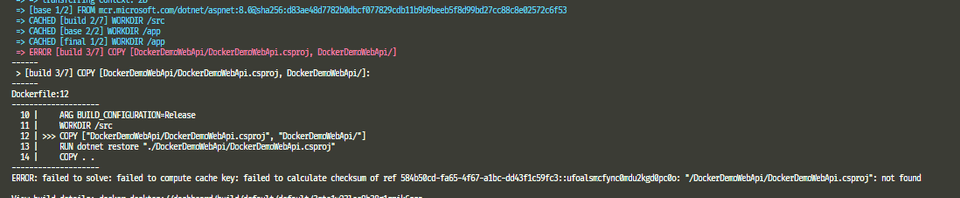
The second step is specifying the Dockerfile path. This is also important because if your Dockerfile path is different from your build context, you may have to use -f flag to specify the Dockerfile path.
You can give a tag and a name to your image with -t flag, but if you don't use it, docker sets <none> for the name and tag. If you only use one word, docker sets that word as the name of the image and shows your current image tag as the latest. However, if you use a colon(:), docker sets the word on the left of the colon as a name and the right of the colon as a tag.
docker build -t docker-demo:v1 -f ./DockerDemoWebApi/Dockerfile .With this command, we tell docker that;
- Our Dockerfile is in the DockerDemoWebApi folder, so, search for it from the current path.
-f ./DockerDemoWebApi/Dockerfile - Your build context is where I execute this command to
. - Your image name is
docker-demoand your tag isv1.
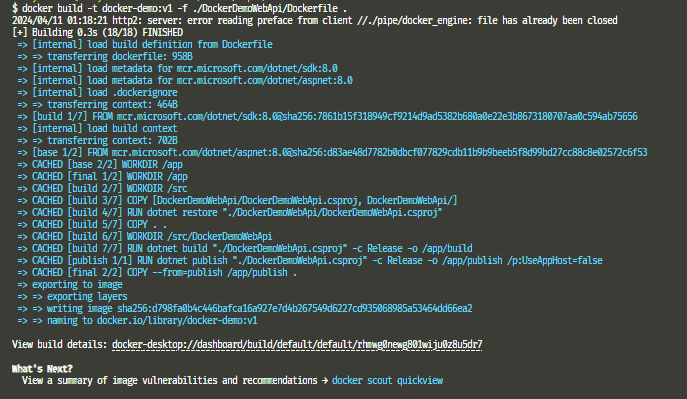
$ docker image lsREPOSITORY TAG IMAGE ID CREATED SIZEdocker-demo v1 d798fa0b4c44 About an hour ago 221MBThe blog took a bit longer, but I wanted you to understand better how Docker builds operations.
Thank you for reading until the end. See you.